This article is an overview of the Part Counting tool that is available in Blackpurl for Dealerships wanting to do random counts, cycle counts as well as a full inventory count
It will allow the Dealership to create count sessions to record physical counts of their available part inventory by scanning in parts / importing a count file or manually entering each part
Do not count any part quantities that are committed to a Customer Order - you are to count only the available quantities of each part
This article will also cover how to prepare for your stock count
Tip:
If you do not have any in-house barcode scanners that will assist you with your count, please review our article on barcode scanning apps - (New Version) Using a Barcode Scanning App to Help with Counting Your Part Inventory
Prerequisites:
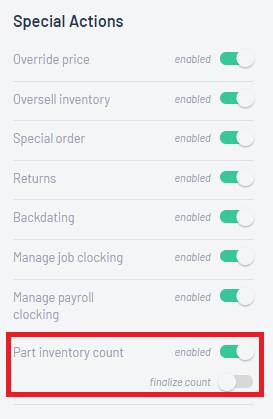
- There is a User permission - Part Inventory Count
- This permission needs to be enabled for the user to have access to the Part Counting tool
- If the Part Inventory Count permission is enable then the next option is if the user is authorised to finalize count session ie process the adjustment entries against the relevant Part records etc
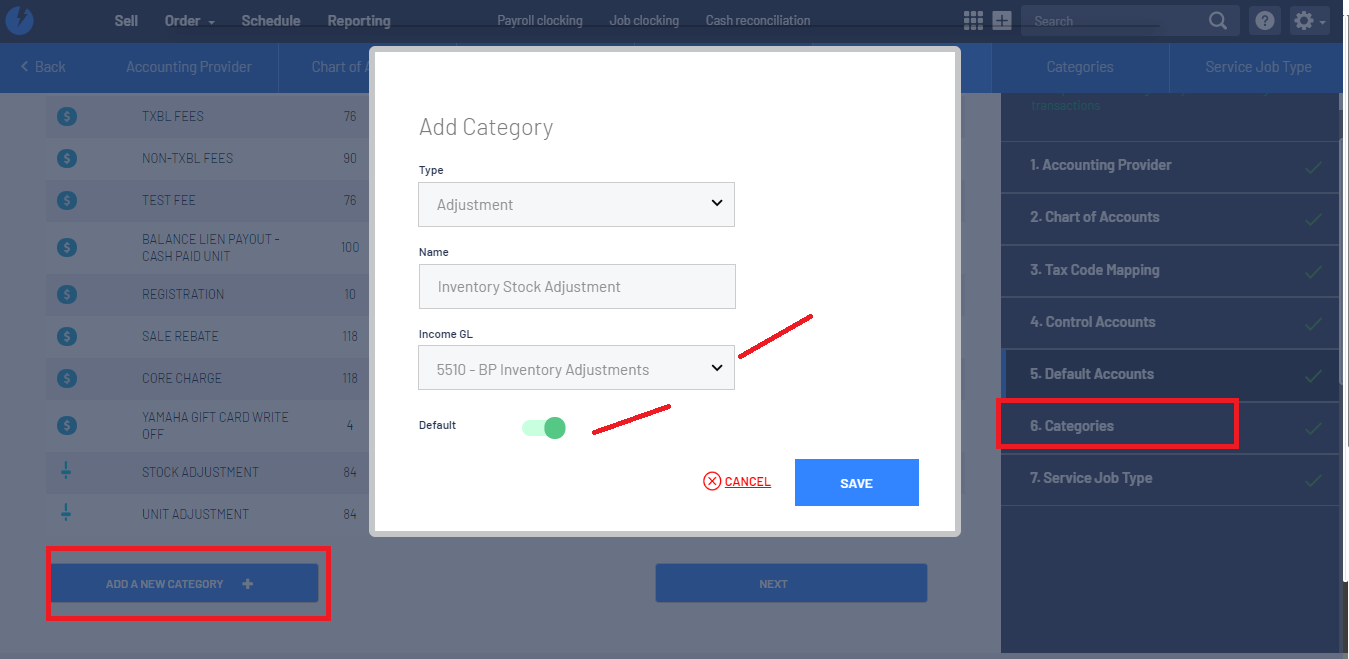
- To finalise a count, the Part Counting tool will require an Adjustment Category
- This category is required as it will tell Blackpurl, what General Ledger to post any adjustment entries to, in your accounting package
- We recommend that you review your categories and if required create a new category:
Type: Adjustment
Name: Stock Adjustment then indicate the relevant General Ledger
For example:
Overview and Setting up new Count Sessions
1. From the Blackpurl Header - click on Tools > Part Counting

2. It will take you to Part Counting section

| 1. | Search List field This will allow you to narrow down your search of the list ie a specific count number Simply click into the field and type your search words  |
| 2. | Count Number This will the reference number used when the system refers to a count session The count session number is generated when you create a count session |
| 3. | Name When the count session was created, the user would have given the count session a specific name |
| 4. | Status What is the status of the Count - Closed or In Progress If it is Closed, you can review the Count but are unable to do any changes If it is In Progress, you can review and change as required |
| 5. | Type What type of Count is it? Random Count Full Inventory Cycle Count See further down in this article, what the difference between these counts are |
| 6. | Count Date What is the date of the Count? This is the date that when you finalize the count, it will use for any journals to your Accounting Package |
| 7. | Created What date the Count was created |
| 8. | Modified / Finalized By If the Count is still open, it will indicate who modified it last If the Count is closed, it will indicate who finalized the count |
| 9. | Counted How many line items were counted |
| 10. | Cost Adjustment If the Count is still open, it will indicate an estimate of the Cost Adjustment If the Count is closed, it will indicate the actual Cost Adjustment amount |
| 11. |  If the rubbish bin is greyed out, you will not be able to delete the Part Count ie it is finalized etc If the rubbish bin is greyed out, you will not be able to delete the Part Count ie it is finalized etc If the rubbish bin is not greyed out, you will be able to delete the Part Count by clicking on the icon If the rubbish bin is not greyed out, you will be able to delete the Part Count by clicking on the icon |
| 12. |  This will allow you to create a new count This will allow you to create a new countThe user will be asked to fill out the Create Count window as to what type of count it is / Date etc  |
| 13. |  This is your Filter option - you can narrow down what you want to show on this list of counts ie Status / Type This is your Filter option - you can narrow down what you want to show on this list of counts ie Status / TypeFor example - you may only want to show In Progress counts so you would change your Status filter to suit  |
3. To start a new count session - click on  and the user will need to complete the
details of the new count session depending on the Count Type:

What is the difference between the Count Types?
- Random count - the Dealership is looking to do a totally random count of parts that have no rhyme or reason / no specific locations / no specific Vendors etc
Dealership will be required to complete the Count Name and Count Date

- Cycle count - the Dealership is doing a cycle count based on a specific Location / Vendor / Category
Dealership will be required to complete Count Name and Count Date and then using the Count Filters select if the count tools is based on a specific Locations / Vendors / Categories
**There is a restriction that you can only add 24 locations to the single Cycle Count

- Full Inventory - this is where the entire available part inventory is going to be counted
The Dealership will be required to complete the Count Name and Count Date

4. Once you have selected the type of count and filled out the required information, then just clicked
on Create Count
Blackpurl will create the relevant Count Session for the type you have selected
Tip - Full Inventory Count Session

Keep in mind that if you are doing a Full Inventory Count, Blackpurl will take a bit of time to prepare the Count Session as it will be collating a list of your full available inventory

Blackpurl will basically do a snap shot of your inventory at the exact time you clicked on Create Count and the Full Inventory Count Session is populated with all part records which have a quantity available that is not zero
Once the count session is ready, you will then see it listing
For example we created a new Cycle count session and it is now listing as In Progress

Please Note:

You can have multiple count sessions running at once but this is not recommended - we would recommend that you start and finish a count session

The system also will not allow parts to be on multiple count sessions - if you try and add a part to a count session but it is already been added to another active count session, a notification message will pop up
Please review the following articles on how to process:
(New Version) Part Counting Tool - Random Count
(New Version) Part Counting Tool - Cycle Count
Was this article helpful?
That’s Great!
Thank you for your feedback
Sorry! We couldn't be helpful
Thank you for your feedback
Feedback sent
We appreciate your effort and will try to fix the article